

Tool: ZapWorks Designer
Time to complete: 30 minutes
Difficulty: Easy
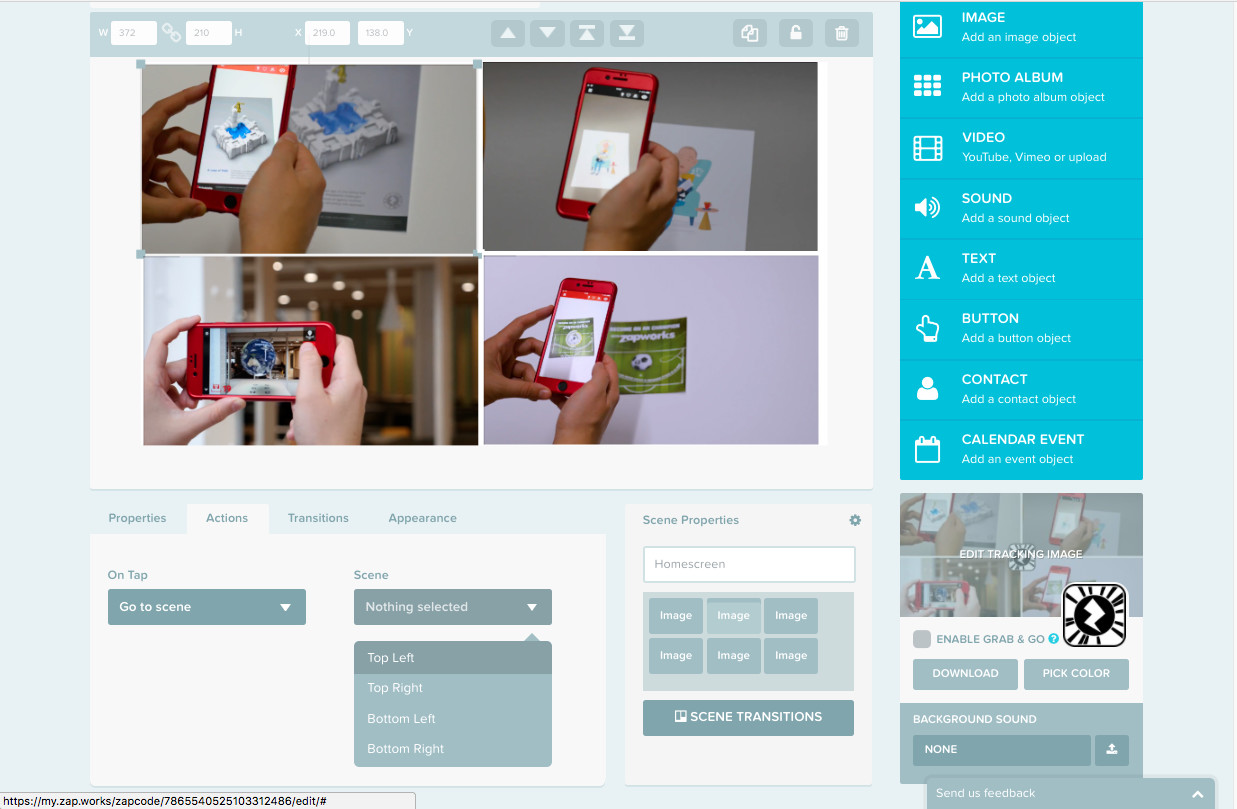
In this Zapworks Designer tutorial, you are going to be creating a tracked augmented reality scene. If you scan the target image above, you will see that each of the four images is the first frame of a video. When the user taps on the individual images, they are taken to a new scene which is of that video playing. We have also added in a back button to each of the videos, which allows the user to return to the home screen and select a new video.
This experience could easily be replicated in several different use cases. It could for instance be used to create a postcard of your recent holiday, or as a piece of marketing material that is sent to potential customers.
The target image was designed using an online graphic design tool called Canva. Canva is really valuable for marketers and non-graphics design professionals who want to easily create great looking designs. If you aren’t experienced in Photoshop then we would definitely recommend that you check it out. Plus, its also free.
Part 1: Creating your target image
1. Download assets for the project.
Click the link here to download all the video and image assets that you will need to create this experience.
2. Open Canva, and create a blank template sized 1360px * 760 px
If you haven’t already got an account with Canva, you will need to sign up. Once you are logged in, you will see at the top right of the screen there is an option to “Use custom dimensions”. Click this button and in the dialogue box that appears, select width 1360 px and height 760 px.
3. Select the template that has 4 images of equal size
Scroll between the different templates to find the template that is made up of four rectangles. Select this.

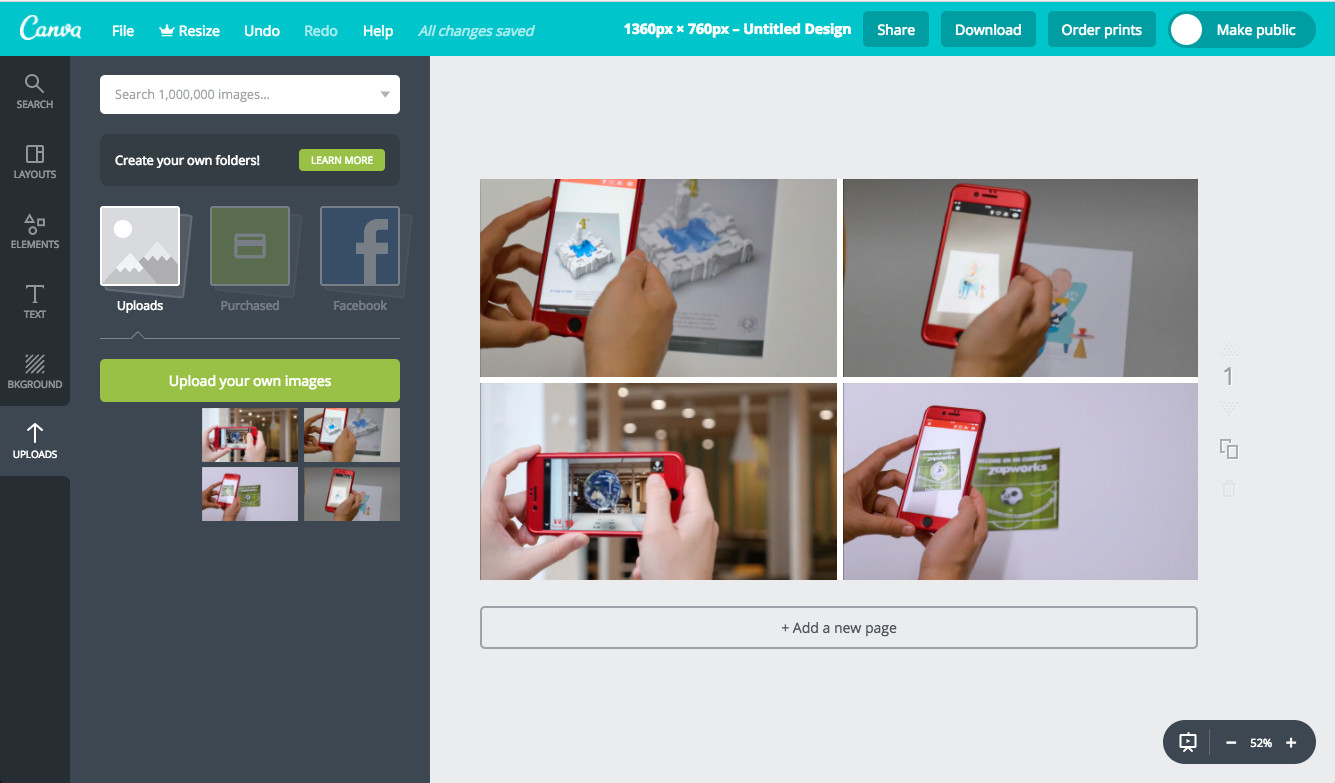
4. Import the 4 images of zapworks experiences
On the left side bar, select the upload tab. Then follow the instructions to upload the four images in the assets folder that you downloaded in step 1. You will find them under Images > First Frame Images.
5. Drag the images into the 4 individual quadrants
Place the four individual photos over the different rectangles. You will notice that they lock into place. You do not need to place these images in the same order as we have done in the image below, however you will want to make sure that you replace any changes that you make in later steps.
6. Create a Designer zapcode in your ZapWorks account
Open up your my.zap.works account. Select the “Make a new zapcode” button and choose either a circle of lozenge style. Select Designer as your editor. Enter your zapcode which should have appeared in your dashboard. Select “Download your zapcode” and choose to download it in the PNG file type.

7. Add your zapcode to your canva image and download
Now that you have downloaded your zapcode, import it into Canva. Place your zapcode in the centre of your grid. Feel free to move the zapcode position to anywhere you think is best. Once you are happy with the position of the zapcode, select “Download” from the top navigation. Select to download your target image as either a JPEG or PNG.

Part 2: Uploading your target image to ZapWorks
8. Upload your tracking image to ZapWorks
Return to your ZapWorks account and into the Designer code you created earlier. Select “Upload Tracking Image” in the wizard. Upload the target image you just created in Canva.
You will see that the tracking image is scored by the tracking image analyser and has good and bad sections, meaning we could improve this image if we wanted to. We will continue. Click “Use this tracking image”.

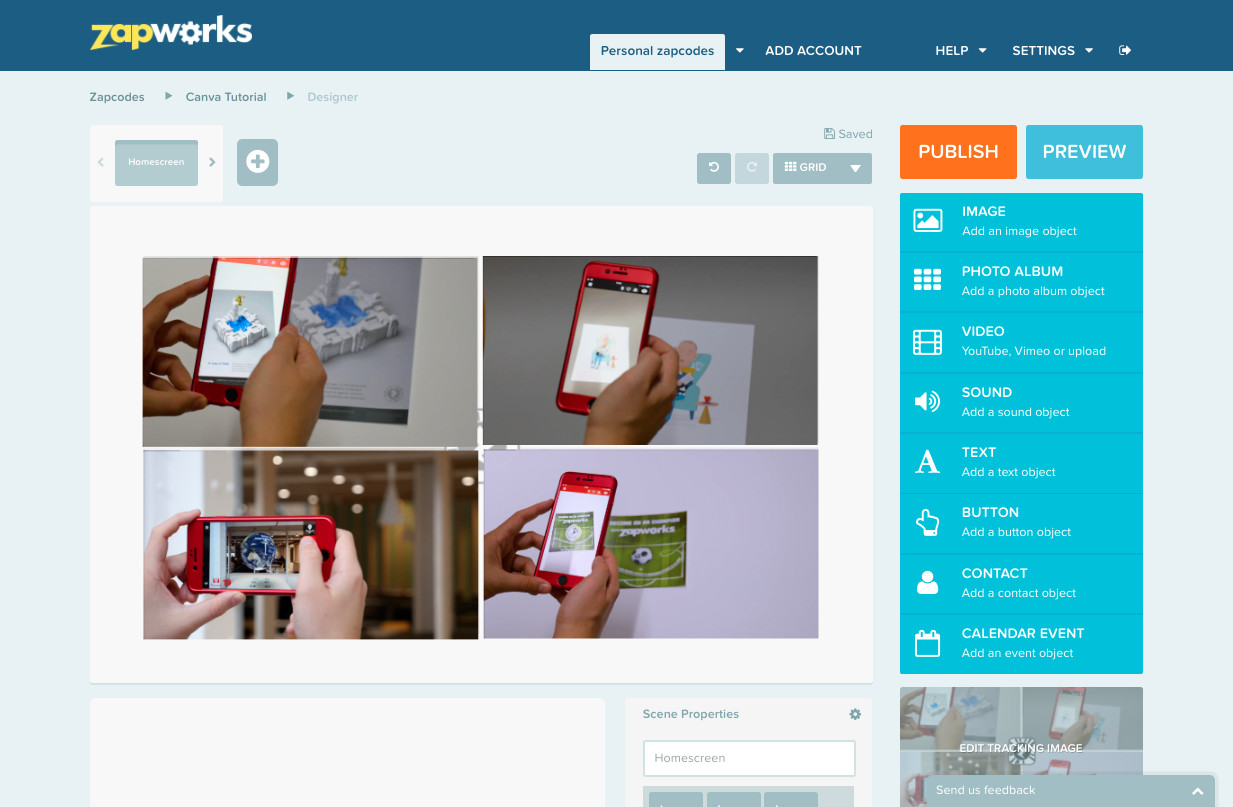
9. Reconstruct the target image in Designer
We will now “reconstruct” the target image in ZapWorks Designer by layering the individual images on top of the target image. Layering the images on top gives us the ability to animate them, which we want to do in this project by linking through a full scene of the individual video playing
Upload the individual images to ZapWorks and layer them on top of the target. Use the width selector and set each of the images width to 372. These images should fit perfectly over the rectangles on our target image.
10. Upload a white plane to cover the target image
You will notice that you can see a transparent line in between the individual images. We want to remove this so that it appears as though the AR scene is identical to the target image minus the zapcode.
Go into the assets that you downloaded in step 1. In the Images folder, select “WhitePlane.png” and upload it to ZapWorks.
Using the width and height selector, set the plane dimensions to 764 x 427 and its position on the x and y axis to 413 and 240.

Push the plane behind the individual images by using the “Send Backwards” button.

Part 3: Creating additional scenes
11. Creating your 4 new scenes for the videos
We have now finished for the time being with our experience home screen. Create four new scenes by pressing the plus button. To keep things organised, give each of your scenes a name. I have gone with “Top Left” “Top Right” “Bottom Left” “Bottom Right”. Also rename your first scene to “HomeScreen”.

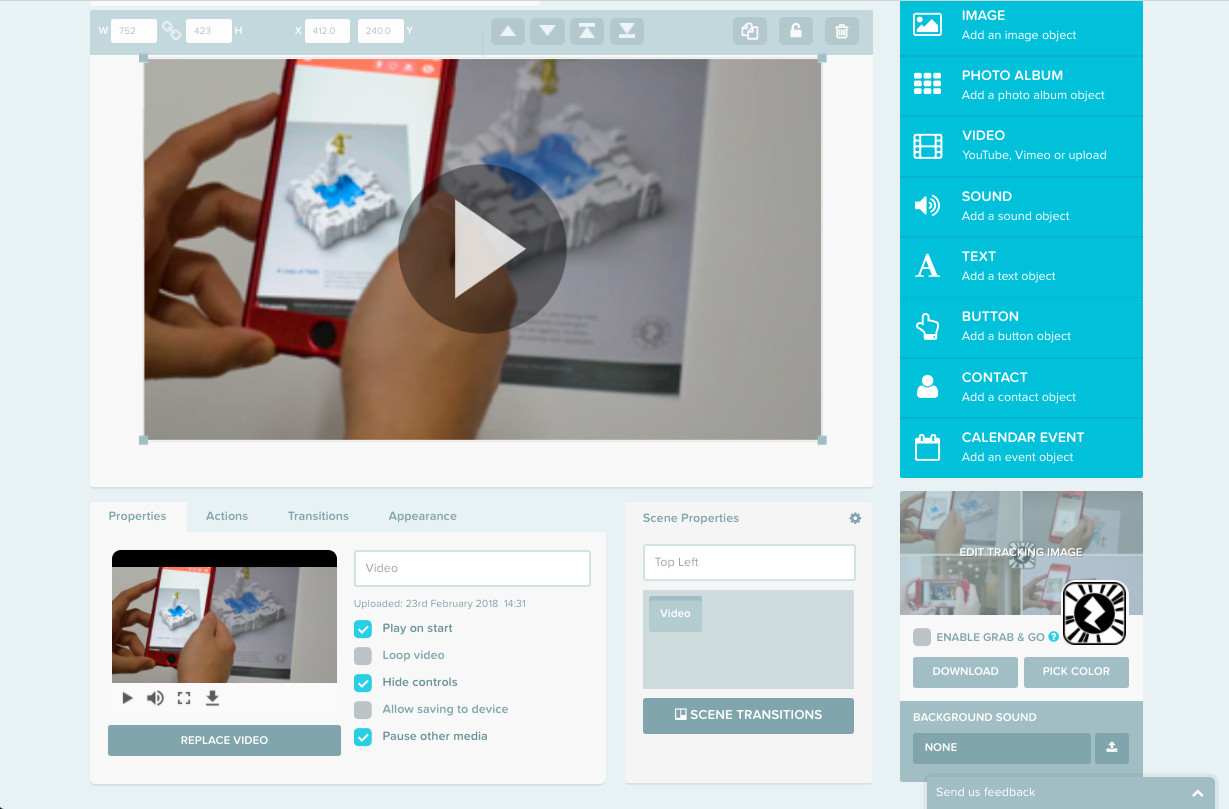
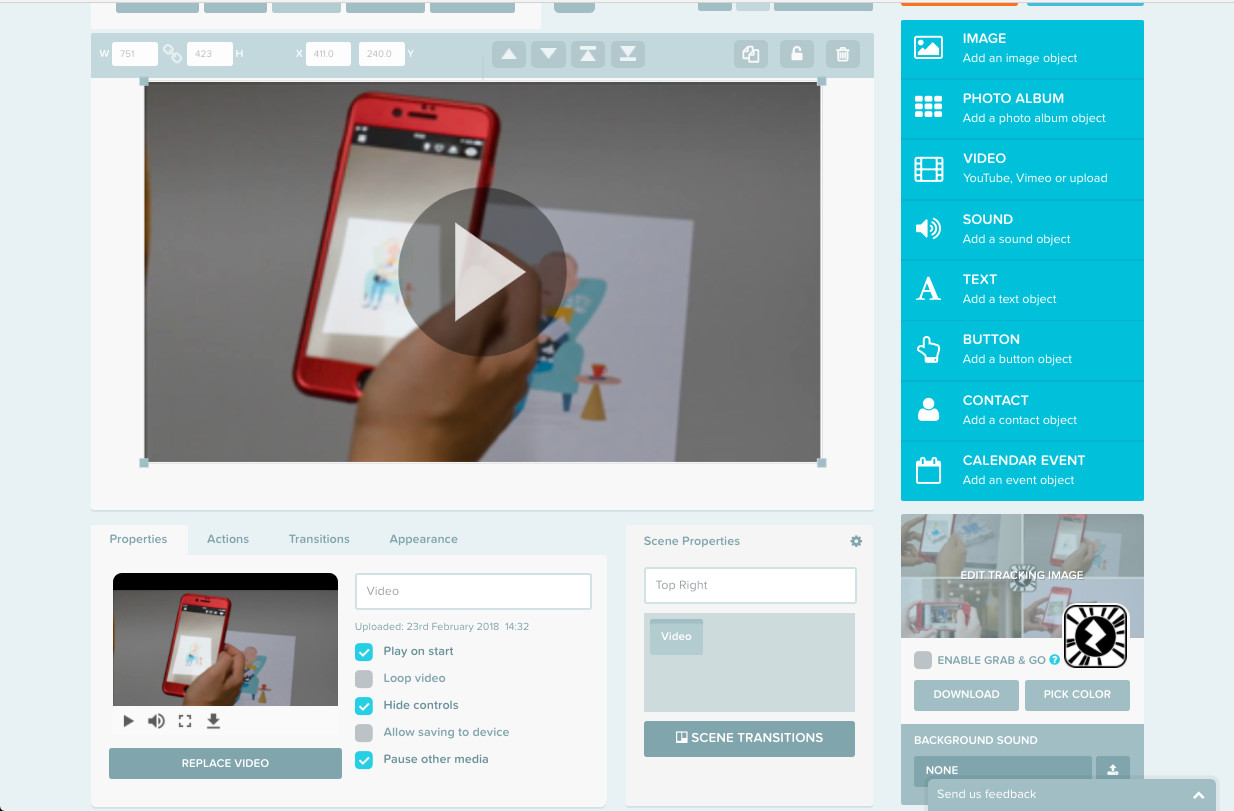
12. Building the “Top Left” scene
Click into the "Top Left” scene. Upload the video “Philadelphia”. Set the video dimensions to 751*423. In the controller bar below, select “Play on Start” and “Hide Controls”.
13. Building the “Top Right” scene
Click into the “Top Right” scene. Upload the video “2D animated card”. Set the video dimensions to 751 * 423. In the controller bar below, select “Play on Start” and “Hide Controls”.
14. Building the “Bottom Left” scene
Click into the “Bottom Left” scene. Upload the video “Saligni”. Set the video dimensions to 751 * 423. In the controller bar below, select “Play on Start” and “Hide Controls”.

15. Building the “Bottom Right” scene
Click into the “Bottom Right” scene. Upload the video “Football”. Set the video dimensions to 751 * 423. In the controller bar below, select “Play on Start” and “Hide Controls”.

16. Linking to the individual scenes
Return to the HomeScene. Click on the top left image. Navigate to the actions tab, and select on top > Go to Scene > Top Left. Repeat this for the top right, bottom left, and bottom right images. Each time send the user to the corresponding image.
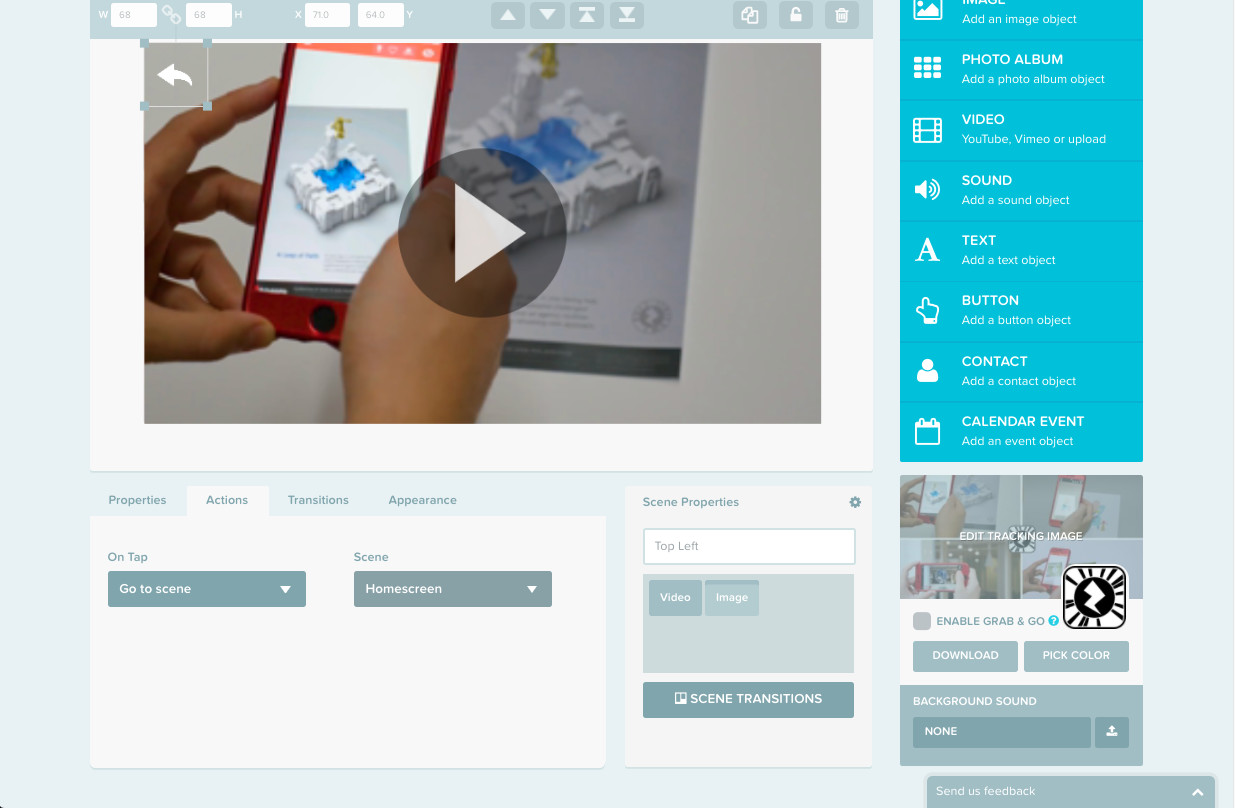
17. Linking back to the HomeScreen
We now need to create a way to go back from our additional scenes to the home screen.
Head into the scene “Top Left”. Upload the “Back Button” image to Designer, and add the back arrow to your scene. Set the size of the image to 68 * 68. Set the x coordinate to 80 and the y coordinate to 60.

Click on the arrow and select Actions > On Tap > Go to Scene > Homescreen
18. Linking to HomeScreen (continued)
Repeat step 17 for the scenes “Top Right” “Bottom Left” and “Bottom Right”
19. Disable grab and go
Before we preview the final thing we will do is to disable grab and go. This will mean that we will only be able to see the content when the target image is in view of the camera. This will help us to maintain the illusion that the content we have just layered on top of the target image is actually there when the user scans.

Preview, publish and print.
Congratulations! You project is now completed and ready to be sent out into the wild. We hope that this tutorial has been helpful in showcasing some of the creative ways you can use ZapWorks Designer.